做教育网站有什么好处html网页制作案例
为什么我们需要线程池?Why?
省流:
为了解决:
1.访问磁盘速度慢
2.等待设备工作
3.....
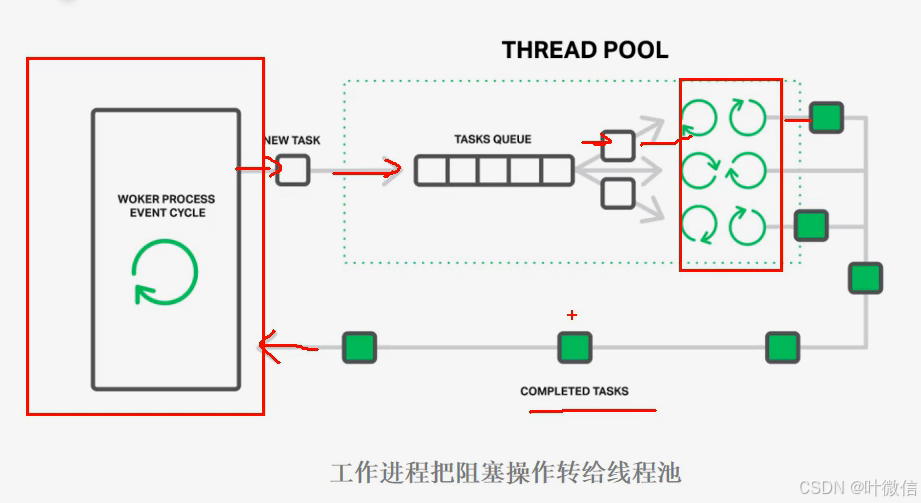
我们使用多线程技术,在IO繁忙的时候优先处理别的任务
为了解决多线程的缺陷:
1.创建、销毁线程时间消耗大
2.创建线程太多使系统资源不足或者线程频繁切换耗时太多
我们采用了线程池技术
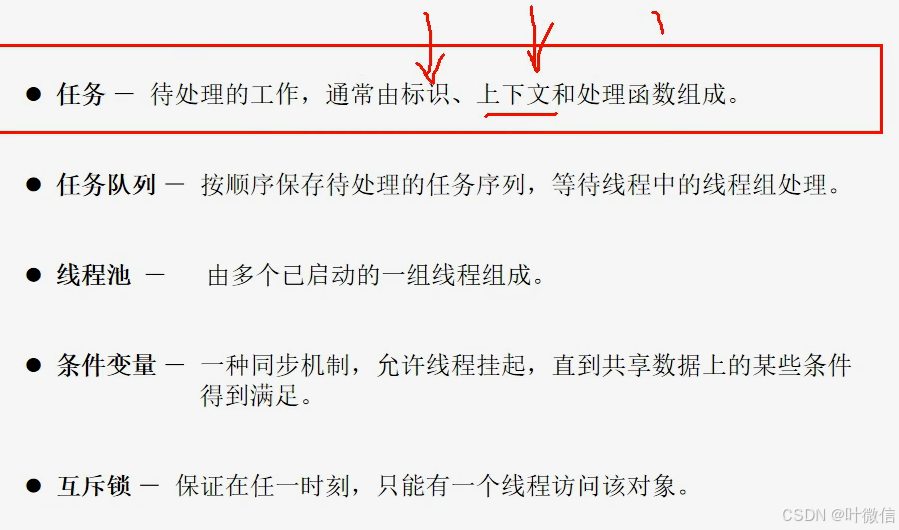
线程池
两个主要组成部分
任务队列(类比银行客户)、线程池(类比银行窗口)
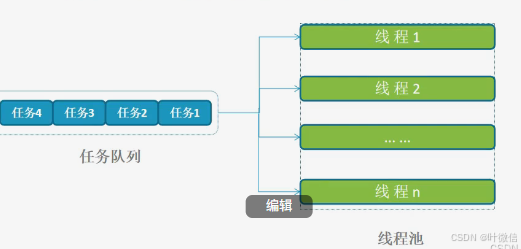
工作流程
1.工作进程碰到需要"阻塞"的操作
2.将操作放进任务队列
3.空闲进程处理任务队列中的任务
核心组件
Nginx线程池源码剖析
thread_pool.h
完成任务、任务队列、线程池的结构定义
#ifndef _THREAD_POOL_H_INCLUDED_
#define _THREAD_POOL_H_INCLUDED_#include "thread.h"#define DEFAULT_THREADS_NUM 4 //默认线程数
#define DEFAULT_QUEUE_NUM 65535 //默认任务队列长度typedef unsigned long atomic_uint_t;
typedef struct thread_task_s thread_task_t;//线程任务
typedef struct thread_pool_s thread_pool_t;//线程池struct thread_task_s {thread_task_t *next;uint_t id;//标识void *ctx;//上下文 指向执行函数参数的起始地址void (*handler)(void *data);//指向空闲线程要执行的函数
};typedef struct {//单链表结构thread_task_t *first;thread_task_t **last;
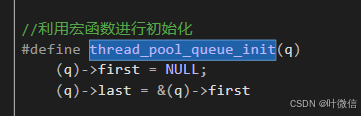
} thread_pool_queue_t;//任务队列//利用宏函数进行初始化
#define thread_pool_queue_init(q) \(q)->first = NULL; \(q)->last = &(q)->firststruct thread_pool_s {pthread_mutex_t mtx;//线程池的互斥锁thread_pool_queue_t queue;//任务队列int_t waiting;//任务队列中的任务数pthread_cond_t cond;//条件变量char *name;//线程池名字uint_t threads;//线程数量int_t max_queue;//最大队列长度
};thread_task_t *thread_task_alloc(size_t size);
int_t thread_task_post(thread_pool_t *tp, thread_task_t *task);
thread_pool_t* thread_pool_init();
void thread_pool_destroy(thread_pool_t *tp);#endif /* _THREAD_POOL_H_INCLUDED_ */
thread_pool.c
thread_pool_init函数——线程池初始化
作用:线程池初始化
thread_pool_t* thread_pool_init()
{int             err;pthread_t       tid;uint_t          n;pthread_attr_t  attr;thread_pool_t   *tp=NULL;tp = calloc(1,sizeof(thread_pool_t));if(tp == NULL){fprintf(stderr, "thread_pool_init: calloc failed!\n");}thread_pool_init_default(tp, NULL);thread_pool_queue_init(&tp->queue);if (thread_mutex_create(&tp->mtx) != OK) {free(tp);return NULL;}if (thread_cond_create(&tp->cond) != OK) {(void) thread_mutex_destroy(&tp->mtx);free(tp);return NULL;}err = pthread_attr_init(&attr);if (err) {fprintf(stderr, "pthread_attr_init() failed, reason: %s\n",strerror(errno));free(tp);return NULL;}err = pthread_attr_setdetachstate(&attr, PTHREAD_CREATE_DETACHED);if (err) {fprintf(stderr, "pthread_attr_setdetachstate() failed, reason: %s\n",strerror(errno));free(tp);return NULL;}for (n = 0; n < tp->threads; n++) {err = pthread_create(&tid, &attr, thread_pool_cycle, tp);if (err) {fprintf(stderr, "pthread_create() failed, reason: %s\n",strerror(errno));free(tp);return NULL;}}(void) pthread_attr_destroy(&attr);return tp;
}
剖析
tp = calloc(1,sizeof(thread_pool_t));
为线程池分配内存
thread_pool_init_default(tp, NULL);
执行默认的初始化(设置默认线程数、任务队列最大长度、线程池名字)
thread_pool_init_default代码如下:
static int_t
thread_pool_init_default(thread_pool_t *tpp, char *name)
{if(tpp){tpp->threads = DEFAULT_THREADS_NUM;//设置默认线程数tpp->max_queue = DEFAULT_QUEUE_NUM;//设置任务队列最大长度tpp->name = strdup(name?name:"default");//设置线程名字if(debug)fprintf(stderr,"thread_pool_init, name: %s ,threads: %lu max_queue: %ld\n",tpp->name, tpp->threads, tpp->max_queue);return OK;}return ERROR;
}
回到thread_pool_init:
thread_pool_queue_init(&tp->queue);用宏函数初始化任务队列
回到thread_pool_init:
创建互斥锁和条件变量,代码如下
if (thread_mutex_create(&tp->mtx) != OK) {free(tp);return NULL;
}if (thread_cond_create(&tp->cond) != OK) {(void) thread_mutex_destroy(&tp->mtx);free(tp);return NULL;
}
对线程属性进行初始化,在线程创建时将其属性设为分离态(detached):父线程使用thread_join 无法等待到结束了的子进程,代码如下:
err = pthread_attr_init(&attr);if (err) {fprintf(stderr, "pthread_attr_init() failed, reason: %s\n",strerror(errno));free(tp);return NULL;}err = pthread_attr_setdetachstate(&attr, PTHREAD_CREATE_DETACHED);if (err) {fprintf(stderr, "pthread_attr_setdetachstate() failed, reason: %s\n",strerror(errno));free(tp);return NULL;}创建线程并消费属性变量(属性已经设置到线程中了,属性变量就没用了),为每个线程设置的任务为thread_pool_cycle(下面介绍)
 for (n = 0; n < tp->threads; n++) {err = pthread_create(&tid, &attr, thread_pool_cycle, tp);if (err) {fprintf(stderr, "pthread_create() failed, reason: %s\n",strerror(errno));
free(tp);return NULL;}}(void) pthread_attr_destroy(&attr);
thread_pool_cycle函数——每个线程的生命周期
完整代码
static void *
thread_pool_cycle(void *data)
{thread_pool_t *tp = data;int                 err;thread_task_t       *task;if(debug)fprintf(stderr,"thread in pool \"%s\" started\n", tp->name);for ( ;; ) {if (thread_mutex_lock(&tp->mtx) != OK) {return NULL;}tp->waiting--;while (tp->queue.first == NULL) {if (thread_cond_wait(&tp->cond, &tp->mtx)!= OK){(void) thread_mutex_unlock(&tp->mtx);return NULL;}}task = tp->queue.first;tp->queue.first = task->next;if (tp->queue.first == NULL) {tp->queue.last = &tp->queue.first;}if (thread_mutex_unlock(&tp->mtx) != OK) {return NULL;}if(debug) fprintf(stderr,"run task #%lu in thread pool \"%s\"\n",task->id, tp->name);task->handler(task->ctx);if(debug) fprintf(stderr,"complete task #%lu in thread pool \"%s\"\n",task->id, tp->name);task->next = NULL;//notify }
}
剖析
进入for循环,尝试对任务队列上锁(因为任务队列是临界资源,访问任务队列前要上锁)
代码如下:
for ( ;; ) {if (thread_mutex_lock(&tp->mtx) != OK) {return NULL;}线程拿到锁之后,使得等待任务数量-1,并调用thread_con_wait函数等待条件变量,并挂起进程,代码如下:
while (tp->queue.first == NULL) {if (thread_cond_wait(&tp->cond, &tp->mtx)!= OK){(void) thread_mutex_unlock(&tp->mtx);return NULL;}
}
thread_pool_cycle和thread_task_post的同步机制cle
thread_cond_wait执行之后,线程会被挂起,并且对tp->mtx进行解锁;
那么什么时候将线程唤醒呢?——在thread_task_post中
thread_task_post的作用是将任务挂载到任务队列中,thread_task_post首先会对线程池进行上锁,然后对task进行初始化,然后唤醒等待条件变量的线程,注意此时cycle线程还不能往下执行,因为thread_task_post已经获得了锁,只有在thread_task_post将任务挂载到队列上并解锁后,cycle才能从thread_cond_wati往下执行。
thread_task_post代码如下:
int_t
thread_task_post(thread_pool_t* tp, thread_task_t* task)
{if (thread_mutex_lock(&tp->mtx) != OK) {return ERROR;}/*此部分对任务属性进行初始化*/if (thread_cond_signal(&tp->cond) != OK) {(void)thread_mutex_unlock(&tp->mtx);return ERROR;}//将任务挂在到任务队列上*tp->queue.last = task;tp->queue.last = &task->next;tp->waiting++;(void)thread_mutex_unlock(&tp->mtx);//对线程池进行解锁/*函数返回*/}
回到thread_pool_init剩下的代码:
task = tp->queue.first;
tp->queue.first = task->next;if (tp->queue.first == NULL) {tp->queue.last = &tp->queue.first;
}if (thread_mutex_unlock(&tp->mtx) != OK) {return NULL;
}if(debug) fprintf(stderr,"run task #%lu in thread pool \"%s\"\n",task->id, tp->name);task->handler(task->ctx);if(debug) fprintf(stderr,"complete task #%lu in thread pool \"%s\"\n",task->id, tp->name);task->next = NULL;//notify
获取任务队列中的任务后进行解锁 (从thread_cond_wati返回时进行了解锁),执行函数handler,结束.....
thread_task_alloc函数——为任务分配内存
作用:为任务分配内存,内存包括两部分:任务结构体所占内存、任务函数的参数所占内存。
thread_task_t *
thread_task_alloc(size_t size)
{thread_task_t  *task;task = calloc(1,sizeof(thread_task_t) + size);if (task == NULL) {return NULL;}task->ctx = task + 1;//ctx指向任务执行函数参数的起始地址return task;
}
传入的参数size用来指定任务的执行函数的参数的大小
task = calloc(1,sizeof(thread_task_t) + size);
为任务分配内存,内存大小为任务结构体大小+参数的大小
task->ctx = task + 1;//tast->ctx指向任务函数参数的起始地址
task指针指向的是任务结体存储的起始地址,task+1表示向下偏移一个thread_task_t的长度,
也就是说task+1指向的是函数变量的起始地址,如图所示
创建任务并传参示例
#include "thread_pool.h"struct test {int arg1;int arg2;
};void task_handler3(void* data) {static int index = 0;struct test* t = (struct test*)data;printf("Hello, this is 3th test.index=%d\r\n", index++);printf("arg1: %d, arg2: %d\n", t->arg1, t->arg2);}int
main(int argc, char** argv)
{thread_pool_t* tp = NULL;int i = 0;tp = thread_pool_init();//线程池初始化//sleep(1);thread_task_t* test3 = thread_task_alloc(sizeof(struct test));//给任务分配内存test3->handler = task_handler3;//为任务设置执行函数((struct test*)test3->ctx)->arg1 = 666;//设置参数值((struct test*)test3->ctx)->arg2 = 888;}
thread_task_post函数——往线程池中投递任务
int_t
thread_task_post(thread_pool_t *tp, thread_task_t *task)
{if (thread_mutex_lock(&tp->mtx) != OK) {return ERROR;}if (tp->waiting >= tp->max_queue) {(void) thread_mutex_unlock(&tp->mtx);fprintf(stderr,"thread pool \"%s\" queue overflow: %ld tasks waiting\n",tp->name, tp->waiting);return ERROR;}//task->event.active = 1;task->id = thread_pool_task_id++;task->next = NULL;if (thread_cond_signal(&tp->cond) != OK) {(void) thread_mutex_unlock(&tp->mtx);return ERROR;}*tp->queue.last = task;tp->queue.last = &task->next;tp->waiting++;(void) thread_mutex_unlock(&tp->mtx);if(debug)fprintf(stderr,"task #%lu added to thread pool \"%s\"\n",task->id, tp->name);return OK;
}
代码剖析
if (thread_mutex_lock(&tp->mtx) != OK) {return ERROR;
}
线程池是临界资源,分配任务前要对线程池上锁。
if (tp->waiting >= tp->max_queue) {(void) thread_mutex_unlock(&tp->mtx);fprintf(stderr,"thread pool \"%s\" queue overflow: %ld tasks waiting\n",tp->name, tp->waiting);return ERROR;
}
线程池中等待任务数量>=任务队列长度,表明任务队列已满,则对任务队列进行解锁并报错
task->id = thread_pool_task_id++;
task->next = NULL;
为任务分配唯一id,thread_pool_task_id是一个全局的静态变量
if (thread_cond_signal(&tp->cond) != OK) {(void) thread_mutex_unlock(&tp->mtx);return ERROR;
}
这里会设置条件变量,唤醒处于thread_con_wait状态的线程池中的线程
*tp->queue.last = task;
tp->queue.last = &task->next;tp->waiting++;
任务队列结构如下:
tp->queue.last是一个二级指针,表示的是队尾节点的指针的地址
通过这个二级指针可以很快地在队尾插入结点,如图所示

wating表示任务队列中等待的任务数目,使其+1
(void) thread_mutex_unlock(&tp->mtx);if(debug)fprintf(stderr,"task #%lu added to thread pool \"%s\"\n",task->id, tp->name);解锁线程池的锁,debug打印信息,没什么好说的。
thread_mutex_create函数——对pthread_mutex_init函数进行封装
int
thread_mutex_create(pthread_mutex_t *mtx)
{int            err;pthread_mutexattr_t  attr;err = pthread_mutexattr_init(&attr);if (err != 0) {fprintf(stderr, "pthread_mutexattr_init() failed, reason: %s\n",strerror(errno));return ERROR;}err = pthread_mutexattr_settype(&attr, PTHREAD_MUTEX_ERRORCHECK);if (err != 0) {fprintf(stderr, "pthread_mutexattr_settype(PTHREAD_MUTEX_ERRORCHECK) failed, reason: %s\n",strerror(errno));return ERROR;}err = pthread_mutex_init(mtx, &attr);if (err != 0) {fprintf(stderr,"pthread_mutex_init() failed, reason: %s\n",strerror(errno));return ERROR;}err = pthread_mutexattr_destroy(&attr);if (err != 0) {fprintf(stderr,"pthread_mutexattr_destroy() failed, reason: %s\n",strerror(errno));}return OK;
}
在pthread_mutex_init的基础上加了错误检查和一些属性的设定。
剖析
err = pthread_mutexattr_settype(&attr, PTHREAD_MUTEX_ERRORCHECK);
if (err != 0) {fprintf(stderr, "pthread_mutexattr_settype(PTHREAD_MUTEX_ERRORCHECK) failed, reason: %s\n",strerror(errno));return ERROR;
}
PTHREAD_MUTEX_ERRORCHECK_NP,检错锁,如果同一个线程请求同一个锁,则返回EDEADLK,否则与PTHREAD MUTEX TIMED NP类型动作相同。这样就保证当不允许多次加锁时不会出现最简单情况下的死锁。
PTHREAD_MUTEX_TIMED_NP,这是缺省值,也就是普通锁。当一个线程加锁以后,其余请求锁的线程将形成一个等待队列,并在解锁后按优先级获得锁。这种锁策略保证了资源分配的公平性。
thread_pool_destroy函数——摧毁线程池
功能:当程序运行将要结束时,摧毁线程池,对资源进行释放。
完整代码
void thread_pool_destroy(thread_pool_t *tp)
{uint_t           n;thread_task_t    task;volatile uint_t  lock;memset(&task,'\0', sizeof(thread_task_t));task.handler = thread_pool_exit_handler;task.ctx = (void *) &lock;for (n = 0; n < tp->threads; n++) {lock = 1;if (thread_task_post(tp, &task) != OK) {return;}while (lock) {sched_yield();}//task.event.active = 0;}(void) thread_cond_destroy(&tp->cond);(void) thread_mutex_destroy(&tp->mtx);free(tp);
}
给线程池中的每一个线程分配一个“自杀”的任务,同时调用sched_yield降低执行thread_pool_destroy函数的线程的优先级。
等分配完"自杀"任务之后,释放条件变量、互斥锁和给线程池分配的内存,线程池就被摧毁了。
“自杀”函数如下:
static void
thread_pool_exit_handler(void *data)
{uint_t *lock = data;*lock = 0;pthread_exit(0);
}
只有自杀函数执行到*lock=0时,执行thread_pool_destroy函数的线程才能给下一个线程分配"自杀"任务,否则就一直执行sched_yield函数,让出CPU时间片。